How to Reduce Autovacuum Bloat in PostgreSQL: A Complete Guide to PostgreSQL Autovacuum
PostgreSQL’s Multi-Version Concurrency Control (MVCC) architecture provides excellent transaction isolation and performance, but it comes with a significant challenge: table bloat. When rows are updated or deleted, PostgreSQL doesn’t immediately remove the old versions, creating “dead tuples” that consume disk space and degrade query performance . While PostgreSQL includes an autovacuum system to address this issue, the default settings are often insufficient for production workloads, leading to progressive performance degradation and excessive storage consumption.
This comprehensive guide will show you how to effectively reduce autovacuum bloat, optimize your PostgreSQL database performance, and implement sustainable maintenance strategies.
What Causes Bloat?
PostgreSQL bloat occurs due to several interconnected factors:
| Cause | Description | Impact |
|---|---|---|
| Heavy Update/Delete Workloads | Frequent modifications create numerous dead tuples | Rapid bloat accumulation |
| Long-Running Transactions | Prevent VACUUM from cleaning dead tuples | Bloat builds up faster than cleanup |
| Conservative Autovacuum Settings | Default thresholds too high for busy tables | Delayed cleanup cycles |
| Insufficient Autovacuum Workers | Limited parallel processing capacity | Cleanup bottlenecks |
The MVCC Challenge
PostgreSQL’s VACUUM command must process each table regularly to recover disk space occupied by updated or deleted rows. However, autovacuum uses conservative defaults that work for small databases but fail spectacularly at scale – like having a vacuum cleaner that only runs when your house is already dirty and moves too slowly to keep up with the mess.
How Autovacuum Works (And Why It Falls Short)
The Autovacuum Decision Process
PostgreSQL ships with conservative default settings that work well for small databases but often fall short in production environments:
Default Configuration Values:
- autovacuum_vacuum_threshold = 50
- autovacuum_vacuum_scale_factor = 0.2 (20%)
Understanding the Impact
These default settings create a significant challenge for high-traffic systems. For example, a table with 1 million rows would need 200,050 dead tuples before autovacuum triggers:
Vacuum Threshold = 50 + (0.2 × 1,000,000) = 200,050 dead tuples
This threshold is clearly insufficient for production systems experiencing heavy update and delete operations, where bloat can accumulate rapidly and degrade performance long before cleanup occurs.
Key Autovacuum Parameters
Understanding these critical configuration parameters is essential for effective autovacuum tuning:
| Parameter | Default Value | Purpose | Impact |
|---|---|---|---|
| autovacuum_vacuum_threshold | 50 | Minimum dead tuples required to trigger vacuum | Lower values = more frequent cleanup |
| autovacuum_vacuum_scale_factor | 0.2 | Percentage of table size added to threshold | Lower values = more aggressive vacuuming |
| autovacuum_vacuum_cost_limit | 200 | I/O cost limit per vacuum cycle | Higher values = faster vacuum processing |
| autovacuum_vacuum_cost_delay | 2ms | Delay between cost limit cycles | Lower values = less I/O throttling |
| autovacuum_max_workers | 3 | Maximum concurrent autovacuum processes | More workers = better parallelization |
| autovacuum_vacuum_insert_threshold | 1000 | Insert-only table vacuum trigger (PostgreSQL 13+) | Handles append-only workloads |
Parameter Relationships
These parameters work together to control autovacuum behavior:
- Threshold parameters determine when vacuum runs
- Cost parameters control how fast vacuum processes data
- Worker parameters define how many tables can be processed simultaneously
Detecting and Monitoring Bloat
Effective bloat management starts with comprehensive monitoring. Use these essential SQL queries to track autovacuum activity and identify problematic tables.
Essential Monitoring Queries
1. Check Autovacuum Activity
Monitor overall autovacuum performance and identify tables with high dead tuple counts:
SELECT
    schemaname,
    tablename,
    n_tup_ins,
    n_tup_upd,
    n_tup_del,
    n_dead_tup,
    last_vacuum,
    last_autovacuum,
    vacuum_count,
    autovacuum_count
FROM pg_stat_user_tables
ORDER BY n_dead_tup DESC;
Key Metrics to Watch:
- n_dead_tup: Number of dead tuples requiring cleanup
- last_autovacuum: When autovacuum last processed the table
- autovacuum_count: How frequently autovacuum has run
2. Calculate Bloat Percentages
Identify tables with concerning bloat levels:
SELECT
    schemaname,
    tablename,
    n_dead_tup,
    n_live_tup,
    ROUND(n_dead_tup * 100.0 / GREATEST(n_live_tup + n_dead_tup, 1), 2) AS bloat_percentage,
    CASE
        WHEN n_dead_tup * 100.0 / GREATEST(n_live_tup + n_dead_tup, 1) > 20 THEN 'HIGH'
        WHEN n_dead_tup * 100.0 / GREATEST(n_live_tup + n_dead_tup, 1) > 10 THEN 'MODERATE'
        ELSE 'LOW'
    END AS bloat_level
FROM pg_stat_user_tables
WHERE n_dead_tup > 100
ORDER BY bloat_percentage DESC;
3. Monitor Vacuum Frequency
Track how often tables are being vacuumed relative to their activity:
SELECT
    schemaname,
    tablename,
    last_autovacuum,
    autovacuum_count,
    n_dead_tup,
    CASE
        WHEN last_autovacuum IS NULL THEN 'NEVER VACUUMED'
        WHEN last_autovacuum < NOW() - INTERVAL '1 day' THEN 'OVERDUE'
        WHEN last_autovacuum < NOW() - INTERVAL '1 hour' THEN 'RECENT'
        ELSE 'CURRENT'
    END AS vacuum_status
FROM pg_stat_user_tables
WHERE n_dead_tup > 100
ORDER BY last_autovacuum ASC NULLS FIRST;
Warning Signs:
- Tables with >20% bloat percentage
- Tables that haven’t been vacuumed in >24 hours despite activity
- Rapidly growing n_dead_tup counts
- Low autovacuum_count relative to table modification frequency
Use these queries regularly to identify tables requiring immediate attention or parameter tuning.
Tuning Autovacuum for Bloat Prevention
Global Configuration Optimization
Tune these parameters in postgresql.conf for better autovacuum performance:
# More aggressive thresholds
autovacuum_vacuum_threshold = 25
autovacuum_vacuum_scale_factor = 0.1

# Faster processing
autovacuum_vacuum_cost_limit = 2000
autovacuum_vacuum_cost_delay = 10ms

# More workers for parallel processing
autovacuum_max_workers = 6

# Better memory allocation
maintenance_work_mem = 1GB

# Enable logging for monitoring
log_autovacuum_min_duration = 1000
Table-Specific Tuning
For heavily updated tables, override global settings with table-specific parameters:
-- For high-traffic tables
ALTER TABLE high_traffic_table SET (
    autovacuum_vacuum_threshold = 10,
    autovacuum_vacuum_scale_factor = 0.05,
    autovacuum_vacuum_cost_limit = 5000
);

-- For insert-only tables (PostgreSQL 13+)
ALTER TABLE log_table SET (
    autovacuum_vacuum_insert_threshold = 500,
    autovacuum_vacuum_insert_scale_factor = 0.1
);
Cost-Based Vacuum Delay Tuning
The cost-based delay system prevents vacuum from overwhelming I/O:
- Lower autovacuum_vacuum_cost_delay: Faster vacuum but higher I/O impact
- Higher autovacuum_vacuum_cost_limit: More work per cycle before delay
- Balance: Adjust based on your I/O capacity and performance requirements
Advanced Bloat Reduction Strategies
When Standard Vacuum Isn’t Enough
Sometimes autovacuum and manual VACUUM aren’t sufficient. Consider these advanced approaches:
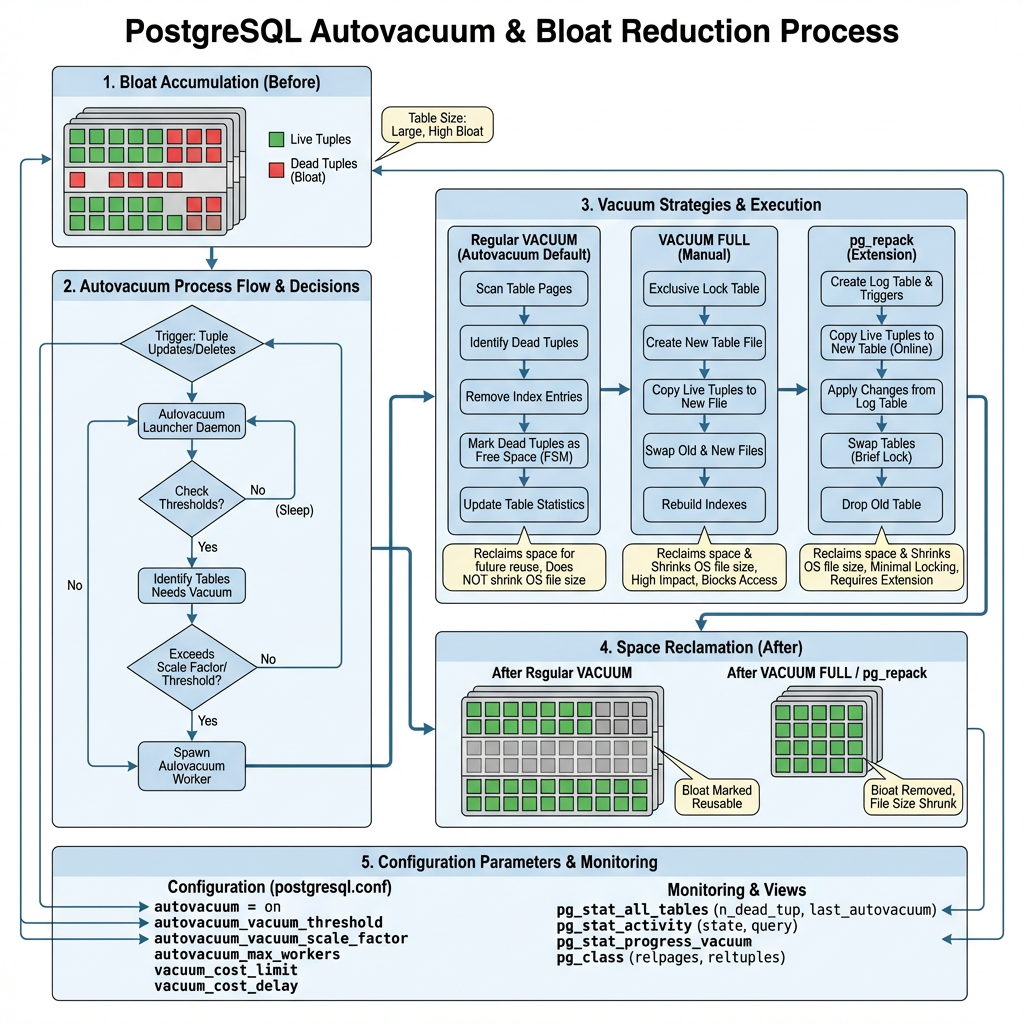
| Method | Downtime | Space Reclaim | Use Case |
|---|---|---|---|
| VACUUM | None | Partial | Regular maintenance |
| VACUUM FULL | Complete | Full | Emergency situations only |
| pg_repack | Minimal | Full | Production environments |
pg_repack: Zero-Downtime Bloat Removal
pg_repack is the preferred alternative to VACUUM FULL, providing online table and index reorganization without holding exclusive locks. It works by creating shadow tables and using triggers to capture ongoing changes.
Installation and Usage:
# Install pg_repack extension
CREATE EXTENSION pg_repack;

# Repack a specific table
pg_repack -t target_table database_name

# Repack entire database
pg_repack database_name

# Repack with specific options
pg_repack --no-order --jobs=4 database_name
Benefits of pg_repack:
- Near-zero downtime operation
- Full space reclamation
- Index rebuilding included
- Parallel processing support
Parallel Vacuum for Large Tables
For very large tables, use parallel vacuum to improve performance:
-- Enable parallel vacuum
SET max_parallel_maintenance_workers = 4;

-- Run parallel vacuum
VACUUM (PARALLEL 4) large_table;
Step-by-Step Implementation Guide
Phase 1: Assessment and Monitoring
Enable Comprehensive Logging:
ALTER SYSTEM SET log_autovacuum_min_duration = 1000;
ALTER SYSTEM SET log_min_duration_statement = 5000;
SELECT pg_reload_conf();
Establish Baseline Metrics:
-- Create monitoring view
CREATE VIEW bloat_monitor AS
SELECT
    schemaname,
    tablename,
    n_dead_tup,
    n_live_tup,
    ROUND(n_dead_tup * 100.0 / GREATEST(n_live_tup + n_dead_tup, 1), 2) AS bloat_percent,
    last_autovacuum,
    autovacuum_count
FROM pg_stat_user_tables
WHERE n_dead_tup > 0;
Phase 2: Configuration Tuning
Implement Graduated Tuning:
-- Start with moderate improvements
ALTER SYSTEM SET autovacuum_vacuum_scale_factor = 0.15;
ALTER SYSTEM SET autovacuum_vacuum_cost_limit = 1000;
ALTER SYSTEM SET autovacuum_max_workers = 4;
SELECT pg_reload_conf();
Monitor and Adjust:
- Wait 24-48 hours
- Check bloat_monitor view
- Adjust parameters based on results
Phase 3: Table-Specific Optimization
Identify Problem Tables:
SELECT * FROM bloat_monitor
WHERE bloat_percent > 20 OR n_dead_tup > 10000
ORDER BY bloat_percent DESC;
Apply Targeted Settings:
-- For each problem table
ALTER TABLE problem_table SET (
    autovacuum_vacuum_scale_factor = 0.05,
    autovacuum_vacuum_threshold = 25
);
Phase 4: Advanced Solutions
Deploy pg_repack for Severely Bloated Tables:
# For tables with >50% bloat
pg_repack -t severely_bloated_table --no-order database_name
Implement Automated Monitoring:
-- Create alert function
CREATE OR REPLACE FUNCTION check_table_bloat()
RETURNS TABLE(alert_message TEXT) AS $$
BEGIN
    RETURN QUERY
    SELECT 'Table ' || schemaname || '.' || tablename ||
           ' has ' || bloat_percent || '% bloat'
    FROM bloat_monitor
    WHERE bloat_percent > 30;
END;
$$ LANGUAGE plpgsql;
Best Practices and Ongoing Maintenance
Proactive Monitoring Strategy
Implement these monitoring practices:
- Daily: Check bloat_monitor view for tables >20% bloat
- Weekly: Review autovacuum logs for long-running operations
- Monthly: Analyze autovacuum effectiveness and adjust parameters
- Quarterly: Consider pg_repack for persistently bloated tables
Configuration Best Practices
- Start Conservative: Begin with moderate parameter changes
- Monitor Impact: Watch for I/O spikes and performance changes
- Gradual Adjustment: Make incremental improvements over time
- Table-Specific Tuning: Focus on high-traffic tables first
Maintenance Schedule
| Frequency | Task | Purpose |
|---|---|---|
| Daily | Monitor bloat percentages | Early problem detection |
| Weekly | Review autovacuum logs | Performance optimization |
| Monthly | Analyze parameter effectiveness | Configuration refinement |
| Quarterly | Consider pg_repack operations | Major bloat cleanup |
Performance Considerations
Proper autovacuum tuning helps avoid:
- Intermittent slowdowns from growing dead tuples
- Index bloat affecting query performance
- Excessive storage consumption
- Transaction ID wraparound issues
Conclusion
Reducing autovacuum bloat in PostgreSQL requires a systematic approach combining proper configuration, proactive monitoring, and strategic use of advanced tools. While PostgreSQL’s default autovacuum settings work for small databases, production environments need aggressive tuning to prevent bloat from degrading performance.
The key to success lies in understanding your workload patterns, implementing appropriate monitoring, and gradually tuning parameters to match your specific requirements. For severely bloated tables, pg_repack provides a zero-downtime solution that standard vacuum operations cannot match.
By following the strategies outlined in this guide, you can maintain optimal PostgreSQL performance, minimize storage overhead, and ensure your database scales effectively with your application demands. Remember that autovacuum tuning is an ongoing process – regular monitoring and adjustment are essential for long-term success.
Key Takeaways:
- Default autovacuum settings are insufficient for production workloads
- Monitoring dead tuple accumulation is crucial for early problem detection
- Table-specific tuning provides the most effective bloat prevention
- pg_repack offers superior bloat removal with minimal downtime
- Ongoing monitoring and adjustment ensure sustained performance
Further Reading:
- PostgreSQL Consulting
- PostgreSQL Remote DBA
- PostgreSQL Support
- Enterprise Database Systems Support
- ChistaDATA University